Wednesday, July 2, 2008

HATS!


Thanks to my friend Sue of McHats and McArt on etsy, I'm now offering hats for sale in my shop. Sue is a very talented milliner from Australia who drafted the patterns for these two hats you see here. She sells these patterns among many others in her shops.


The bucket hat is reversible (I dig reversible things!).


I just love kids in hats. Not only are they cute in them, but in summer they protect them from the sun and in winter from the cold. I cringe when I see babies out in winter with bare heads!
Stay tuned, more hats on their way!

Wednesday, June 11, 2008

Pincushions!


Since my dear old sewing machine (which is now considered vintage) is puttering and hiccuping, my Mom suggested we try out this pincushion challenge offered by AllPeopleQuilt.com. Grand prize is a new sewing machine! So, we gave it a whirl. You have to enter with a partner and since she taught me everything I know about sewing, who better to enter with than Mom herself.

The first round of judging is won by popular vote. I hope we have enough time to get enough hits!!


If you, wonderful reader, don't mind. Would you take a second to vote for our pincushions?


edit: Voting is officially closed for the pincushion challenge. Thanks to all who voted! Fingers Crossed!

This is the link for my pincushion
and
this is the link for Mom's pincushion

We thank you in advance! -Jen

Friday, February 22, 2008

Tutorial - Recycled Plastic Bottle Bag

This tutorial will show you how you can make this simple carry-all from a recycled plastic bottle.

This basic pattern can be altered in so many ways such as different color applications and combinations of different crochet stitches to give you a different look or design. Here I've posted a basic pattern using single crochet, double crochet and triple crochet. There are many great websites that teach how to do these simple stitches.

To make a bag like the one shown here you will need:

-One empty and clean plastic bottle, such as vinegar, bleach, detergent, etc. (I used a 2 QT vinegar bottle.)

-Approximately 2-3 oz. yarn (I used worsted weight cotton yarn)

-crochet hook (I used H/5mm) Make sure your hook is small enough to fit through your holes punched in the bottle.

-Hole punch and scissors

1. Prep the plastic bottle by cutting the top off. If the top edge is sharp you may want to use fine sandpaper to smooth the edge. With your hole punch make an evenly spaced row of holes along the top edge. Be careful that the holes aren't too close to the edge.

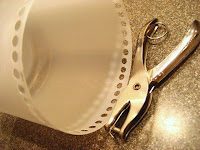


2. Attach yarn to the bottle:
(round 1) Make a slip knot on your hook, insert hook through first hole in bottle and crochet a SC through hole. Continue to make one SC through each hole around. Join to beginning SC.


3. Crocheting the top:
(round 2) 1 SC in each SC across.
(round 3) *2SC in first SC, 1 SC in next 5SC*; repeat from * around
(round 4) *2SC in first SC, 1 SC in next 4SC*; repeat from * around
(round 5) *2SC in first SC, 1 SC in next 3SC*; repeat from * around
(round6-until desired height) 1SC in all sts around and around. (I did 6-24 rows)


*Bonus-you always have a place to store your yarn and hook when working on this project. :)


4. Once you've reached your desired height:
CH3, *skip 1 SC, TR, CH1*; repeat from * to * around, join to CH.
1SC in all stitches around

5. Scalloped edge:
*6 DC in first "space", SC in next "space"*; repeat from * around
Fasten off, weave in ends.

6. Make drawstring:
There are two applications you could use here. I've a CH st chain about 1 and a half times the length of the top edge. Then I wove my chain through the TR spaces.


An alternative to this would be to make two chains about 10 inches longer than the length of the top edge. Weave both chains through the TR spaces. Fasten each chain to itself to make two individual loops. Then pull each loop in opposite directions to cinch closed.

Viola!


Note-I chose to crochet in the round for a seamless look. Also--If you're number of holes punched is an odd number that doesn't exactly coordinate with the pattern-adjust to your needs. This pattern is very flexible and doesn't really need to be concise with increases and number of stitches.)

If you make a recycled bag using this tutorial I'd LOVE to see it. Please leave a link in the comment section of this post. If you'd like to share a link to this tutorial on another site that would be awesome, but please give me a heads up!

This tutorial is intended for personal use, please don't sell goods made from this pattern.

*I don't claim to be an expert at writing a crochet pattern, if you find the directions confusing or an error please let me know!

Tuesday, February 19, 2008

EtsyMom's Spring Charity Auction

The EtsyMom street team is organizing a spring promotion to raise money for charity. A basket of donated etsymom goods will be auctioned off at Mommy Auctions. You can visit the EtsyMom blog for details and information on how to win this basket of goodies! I've donated this Spring Chick Necklace for the basket:

Saturday, February 2, 2008

Be Mine


My personal theory is that Valentine's Day has been strategically placed smack dab in the middle of winter blah. Something to get our mind off of the fact that I haven't felt the warmth of the sun on my skin in oh, I don't know 100 days or something ridiculous like that! A little red warm fuzzy to remind us that it's not that bad....somebody loves you.
I hope you have a warm fuzzy day.

Tuesday, October 30, 2007

MineFull Stamp

My new MineFull logo stamp handcarved by CraftPudding. I was printing my own labels from my computer onto fabric, but I love the versatility the stamp offers.

Friday, September 21, 2007

Fabric Swap Goodness

Today I received this wonderful package in the mail from my fabric swap partner Amber. Creative ideas just exploded in my mind as I looked through the wonderful fabric scraps she sent me. She also wrapped it so sweetly, I just love ric-rac.


This was my first fabric swap, it was fun going through my bits and pieces in anticiaption that someone else may find a creative use for them. I hope Amber liked the fabrics I sent her.

What I'm reading

I'm currently reading Craft Inc.; Turning Your Creative Hobby Into a Business by Meg Mateo Ilasco. You can tell the book is made by a creative person for a creative person. It's a beautiful book, with some great advice. (Now if I could only find more hours in a day for reading time!)


Wednesday, September 19, 2007

I've been tagged!


Thanks to Mud and Mint I've been tagged asking to share six interesting things about myself and ask six others to do the same....well, interesting or not, here it goes:
1. I'd almost always take a good bagel with cream cheese over chocolate (or any other sweets for that matter).
2. I was a cemetery security guard a couple of summers while in college.
3. I have a birthmark on my thigh that's the shape of a cow skull. You know, the kind you see in the wild west movies with the tumble weeds blowing by...
*Que wild west whistle music ooOooOoo*
4. When I was a kid my Mom enrolled me in clown classes, yes clown classes. I was pretty shy and she wanted to get me involved in something, so while my friends were in little league baseball and gymnastics, I was a CLOWN :o(
5. I think "Yo Gabba Gabba" is the best thing to happen to TV in years!
6. I used to play the bass (the acoustic upright string bass-not the cool rocker chic electric bass.)
Here are the blogs that I'm tagging, take a look:

Sunday, September 2, 2007

my crafty kids

My daughters have the crafting itch. It's hereditary. They watch me sew so often that every now and then they have to make something for themselves. Serene's favorite is pillows, Esme's is whatever her big sister is making. Here Serene is perfecting the slip stitch and Esme is having fun stuffing her pillow.

Friday, August 10, 2007

That's Clever!


My sister-in-law made me one of the cleverest cards I think I've ever seen. She sandwiched a magnet between two pages on the front of the card. A paper flower with magnet attached to the back sat on the front cover. (It's now beautifying my fridge!) Thanks Mary :)

Monday, August 6, 2007

Prize Fabric!


I was excited to see a package in my mail today. It was this wonderful pack of fabric from Sew, Mama, Sew. This is my prize for winning second place in their July Bag Contest. I received ten 1/2 yards of Katie Jump Rope fabric by Denyse Schmidt. I've been admiring Denyse Schmidt designs but have yet to buy any, now I have a chance to try out this gorgeous fabric! Thanks again to the folks over at Sew, Mama, Sew!


Sunday, August 5, 2007

Crock Pickles


Making crock pickles is an annual tradition in my family. As a kid, it was always exciting to test the first pickle. As an adult I still find the first crock pickle of the season to be a joy. My Grandmother, who is going on 93, doesn't make the pickles anymore. The family 5 gallon crock has been handed down to my Dad who so graciously brings the crock to my house every year to set the pickles up (thanks Dad). (honestly, I don't know what my Dad would do with 5 gallons of pickles. I'm not sure what I'm going to do with 5 gallons myself, but they always seem to disappear pretty quickly.)

One of the secrets to good crock pickles is freshly picked firm cucumber pickles. Personally I prefer the smaller pickles, but traditionally the rounder medium pickles are used. It's one of those recipes that you can easily tweek to your liking.

Main ingredients:
Fresh picked firm cucumber pickles
Fresh dill (I use 2-3 bunches for 5 gallons)
garlic, cloves peeled (I use 2 heads for 5 gallons)
pepper of some variety. (half sharps, sharp, jalapeno, bannana) (I use one-half sharp of 2 jalapenos for 5 gallons )
Water
Canning salt
White vinegar
a crock, a plate, and a quart jar filled with water for a weight

Brine: make enough brine to fill your crock (for my 5 gallon crock I make 2 1/2 gallons of brine)
1 gallon water
1/2 C canning salt
1/2 C vinegar
-Bring brine to a rolling boil
After washing your pickles and dill, it's time to fill the crock.

The first layer should line the bottom of the crock with dill (about 1/3 of your dill), then add about half of the pickles with garlic and pepper. Add another layer of dill, pickles, garlic and peppers, finish with the top layer being dill.

Pour in the brine, making sure all the pickles are well covered. Invert a plate over the top of the pickles and place your water filled quart jar on the plate. Cover with a towel and let sit at room temperature for about 24 hours.
Taste a pickle to see if they are ready. Larger pickles may need more time to set up. Once you're satisfied with the flavor transfer your pickles to jars with some brine and refrigerate. YUM!


Friday, August 3, 2007

WIST Christmas in July swap


Our WIST street team had a Christmas in July gift swap and I'm the lucky new owner of a piece of pottery made by EarthElements. This business card holder will be perfect for art and craft shows! Kathi makes the most beautiful nature inspired pottery, I love how she incorporates wood into her work. Thanks Kathi!!

Thursday, August 2, 2007

Sewing Excitement!

I was thrilled to learn that my convertible wristlet won 2nd place in the Sew,Mama,Sew bag contest. My bag was in the "other" category, there were also winners in the tote, shoulder bag, and handbag category. There were so many wonderful entries, it must have been fun to judge this contest. You can read all about it in their blog. Thank you Sew,Mama,Sew!!
Here's my matching wrap skirt.

Friday, July 13, 2007

My entry for the Sew, Mama, Sew July Big, Big Bag Month contest is this convertible wristlet/shoulder bag. I designed this bag out of my own needs. I found that I loved to carry my essentials in a wristlet size bag, but now and then I wished that I could fit it on my shoulder. So I came up with this convertible design.
When the swivel clip is attached to the zipper the strap acts as a wristlet strap, and seconds as a great zipper pull. When the swivel clip is attached to the D-ring the strap can be used to carry the bag on your shoulder.
Over the last year I've changed the shape of the bag of few times, this pleated version is my most recent pattern.


The bag is 8 inches across the top, and 9.5 inches at it's widest width. The bag is 6.5 inches deep. Just right for carrying a coin purse, business card/credit card case, lip balm and whatever other essential bits and pieces I may need.


I've also added two pockets inside to help keep things in their place.

Monday, July 2, 2007


Etsy's Wisconsin Street Team (WIST) now has it's own CafePress shop! ZenithJade has even made one of my WIST postcards and one of my photographs into some great little WIST products! Proceeds from the WIST CafePress shop go to help fund WIST projects.

Saturday, June 30, 2007

MineFull promo stickers

I just love my new etsy promo stickers made by Jelene at etsy. Can't wait to start slapping these on packages!

Monday, June 25, 2007

Wisconsin Street Team Contest Entry


This is my entry for the Wisconsin Street Team's wood violet contest. The photo is of a wood violet that I discovered on a hike in the park I live across the steet from. It's adhered to a glass tile to make the pendant. I've added it to my etsy store. I'd have to say that the purple and green color combination is one of my favorites.

Thursday, June 7, 2007

Rhubarb Nectar Recipe

Here's a fantastic recipe that was brought to my attention by a friend on flickr. It's a great way to use the larger stalks of rhubarb and makes a refreshingly tart summer drink.


Rhubarb Nectar:
*10-12 stalks of rhubarb, cleaned and chopped
*1 lemon, unpeeled and chopped
*1 lime, unpeeled and chopped
*1-2 oranges, unpeeled and chopped
*1 piece of fresh ginger root, about 1-2" piece, chopped


Add all ingredients to a large pot and simmer over a low heat until the mixture is mush, about an hour. (stirring now and then of course)


Place a colander over a large bowl or pot and line with a piece of cheese cloth.

Pour mixture into colander and strain. Gather up edges of cloth and wring tightly pressing with a flat spatula to strain out all the juice.


Pour nectar into jars or bottles and refrigerate or freeze.
(tip: freeze in ice cube trays for individual serving sizes)


Rhubarb Nectar Mixers:
1 part rhubarb nectar
3 parts tonic water or club soda
(1 part vodka-optional)